
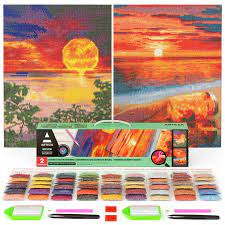
Diamond painting is a popular craft that has been gaining popularity in recent years. It is a form of art that involves placing tiny diamond-like beads onto a canvas to create a beautiful and sparkling image. The process is similar to paint-by-numbers, but instead of using paint, it uses small resin or acrylic diamonds that are placed on a sticky canvas.
The canvas for diamond painting comes with a printed design that has symbols or numbers on it. Each symbol corresponds to a specific color of diamond, and the goal is to fill in the entire canvas with the corresponding diamonds. The diamonds come in small packets with numbers or symbols on them as well, making it easy to match them with the design on the canvas.
Diamond painting can be done by people of all ages and skill levels. It is an enjoyable and relaxing activity that can be done alone or with friends and family. The process of placing each diamond onto the canvas takes time and requires patience, but the end result is worth it.
One of the benefits of diamond painting is that it can help reduce stress and anxiety. Many people find it therapeutic to focus on something creative and calming for an extended period of time. It can also improve hand-eye coordination, concentration, and fine motor skills.
Diamond painting kits come in various sizes and designs, from small beginner kits to larger more complex designs for experienced crafters. There are also custom kits available where you can upload your own image or photo and have it turned into a diamond painting kit.
In conclusion, diamond painting is an enjoyable and relaxing craft that has many benefits for people of all ages. It provides an opportunity to create beautiful sparkling artwork while reducing stress and improving cognitive skills. Whether you are new to crafting or an experienced artist, diamond painting is definitely worth trying out!
6 Essential Tips for Successful Diamond Painting Projects
- Read the instructions carefully before beginning your diamond painting project.
- Sort your diamonds by color and size before starting to put them on the canvas.
- Use tweezers or a wax pen to pick up and place the diamonds on the canvas accurately and easily.
- Start from one corner of the canvas and work your way outward in rows or columns to ensure even coverage of diamonds.
- Take breaks often while diamond painting as it can be quite tiring for eyes, hands, and back after long hours of working with small pieces of diamond drills!
- Keep all tools used for diamond painting clean so that they don’t become contaminated with dirt or dust which could ruin your project!
Read the instructions carefully before beginning your diamond painting project.
If you’re new to diamond painting, it’s essential to read the instructions carefully before starting your project. The instructions will guide you on how to properly prepare your canvas, how to place the diamonds accurately, and how to finish your artwork.
The first step is to ensure that you have all the necessary materials for your project. Check that you have the correct canvas size, enough diamonds of each color, a diamond applicator tool, and a wax pad.
Next, carefully examine the canvas and identify any symbols or numbers printed on it. Each symbol or number corresponds to a specific color of diamond. It’s crucial to match the diamonds with the correct symbols or numbers on the canvas; otherwise, your artwork may not turn out as expected.
Once you’ve identified all the symbols and colors on your canvas, it’s time to start placing the diamonds. Use the diamond applicator tool to pick up each diamond and place it onto the corresponding symbol on the canvas. Be sure to press down firmly so that each diamond sticks securely onto the canvas.
Finally, when you’ve completed your diamond painting project, follow the instructions for finishing it properly. Some canvases require sealing with glue or varnish to protect them from dust and damage.
In conclusion, reading instructions carefully before starting any project is crucial for success. This is especially true for diamond painting since accuracy and attention to detail are essential for creating beautiful artwork. By following these tips and reading instructions carefully, you’ll be well on your way to creating stunning diamond paintings!
Sort your diamonds by color and size before starting to put them on the canvas.
If you’re new to diamond painting, sorting your diamonds before starting can make the process much easier and more enjoyable. Sorting the diamonds by color and size will help you quickly find the right diamond for each section of the canvas, which saves time and reduces frustration.
To sort your diamonds, start by pouring them onto a flat surface like a tray or a plate. Then, use a small container or organizer to separate them by color. You can label each container with the corresponding symbol or number from the canvas to make it even easier to find what you need.
Next, sort each color by size. Some kits may have different sizes of diamonds for certain sections of the canvas, so it’s important to keep them organized. You can use small baggies or containers for each size and label them accordingly.
Once you have all your diamonds sorted, you’ll be ready to start placing them on the canvas. Having everything organized beforehand will make the process smoother and more enjoyable, allowing you to focus on creating beautiful art without getting bogged down in searching for the right diamond.
Overall, sorting your diamonds before starting diamond painting is a simple but effective tip that can help make your crafting experience more efficient and enjoyable. Give it a try next time you start a new project!
Use tweezers or a wax pen to pick up and place the diamonds on the canvas accurately and easily.
Diamond painting is a fun and rewarding craft, but it can also be quite challenging to place the small diamond-like beads onto the canvas accurately. To make the process easier and more precise, it’s recommended to use tweezers or a wax pen.
Tweezers are a great tool for picking up and placing the diamonds onto the canvas. They allow you to grip the diamond firmly and place it exactly where you want it to go. Tweezers come in different sizes, so you can choose one that works best for your needs.
Another useful tool is a wax pen. A wax pen is a small tool with a sticky tip that allows you to easily pick up and place diamonds onto the canvas. The wax on the tip of the pen helps to hold the diamond in place until you’re ready to place it on the canvas. This makes it much easier to work with small diamonds and ensures that they are placed accurately.
Using tweezers or a wax pen can save time and frustration when working on your diamond painting project. It allows for greater precision and accuracy, which results in a more beautiful finished product. So, if you’re struggling with placing those tiny diamonds onto your canvas, consider using tweezers or a wax pen for an easier and more enjoyable experience!
Start from one corner of the canvas and work your way outward in rows or columns to ensure even coverage of diamonds.
When it comes to diamond painting, starting from one corner of the canvas and working your way outward in rows or columns is a great tip to ensure even coverage of diamonds. This technique helps to avoid any gaps or unevenness in the final result.
By starting from one corner, you can focus on one small section at a time and make sure that each diamond is properly placed before moving on to the next row or column. This allows for greater precision and accuracy throughout the entire canvas.
Working in rows or columns also helps to keep track of which diamonds have already been placed, making it easier to avoid mistakes and ensure that each diamond is placed in the correct spot. It also helps to maintain a consistent pattern and direction throughout the canvas.
Overall, starting from one corner and working your way outward in rows or columns is a simple yet effective tip for anyone looking to create a beautiful diamond painting. By following this technique, you can achieve an even coverage of diamonds and create a stunning piece of art that you can be proud of.
Take breaks often while diamond painting as it can be quite tiring for eyes, hands, and back after long hours of working with small pieces of diamond drills!
Diamond painting is a fun and engaging craft that requires patience and attention to detail. However, it can also be tiring for the eyes, hands, and back after long hours of working with small pieces of diamond drills. That’s why it’s important to take breaks often while diamond painting.
Taking breaks can help prevent eye strain and fatigue, as well as reduce the risk of developing repetitive strain injuries such as carpal tunnel syndrome. It’s recommended to take a 5-10 minute break every hour or so to stretch your hands and back, rest your eyes, and relax your mind.
During your break, you can do some gentle stretches or take a short walk to get your blood flowing. You can also use this time to hydrate yourself with water or have a healthy snack to refuel your body.
Remember that diamond painting is meant to be a fun and enjoyable activity, not something that causes physical discomfort or pain. By taking breaks often, you can ensure that you’re able to continue working on your project without putting too much strain on your body.
In conclusion, taking breaks often while diamond painting is an essential tip for anyone who wants to enjoy this craft without risking injury or discomfort. So remember to listen to your body and take care of yourself while creating beautiful sparkling artwork!
Keep all tools used for diamond painting clean so that they don’t become contaminated with dirt or dust which could ruin your project!
When it comes to diamond painting, keeping your tools clean is crucial for the success of your project. The tiny diamond-like beads used in this craft are delicate and can easily be ruined by dirt or dust. Therefore, it is important to keep all tools used for diamond painting clean to prevent contamination and ensure that your project turns out beautifully.
To keep your tools clean, start by wiping them down with a soft cloth or tissue after each use. This will remove any excess glue or debris that may have accumulated on them. You can also use a small brush or toothbrush to gently scrub away any stubborn residue.
Additionally, make sure to store your diamond painting tools in a clean and dry place when not in use. Avoid leaving them out in the open where they can collect dust or other contaminants.
If you notice that some of your tools have become contaminated with dirt or dust, it is best to replace them with new ones. Using contaminated tools can ruin your project and cause frustration and disappointment.
In conclusion, keeping all tools used for diamond painting clean is essential for the success of your project. By taking the time to properly care for your tools, you can ensure that your diamond painting experience is enjoyable and stress-free!